Showing posts with label projects. Show all posts

Tuesday, February 3, 2009

Giant Robot Headed for Colorado


Woot! We're going to Colorado! Sparkfun.com is hosting an Unmanned Autonomous Vehicle contest in their parking lot in April. This is exactly the kind of contest my powerwheels robot is designed for!

When I first read about the competition, my first reaction was "of course we never have anything like this in Oklahoma." Then I thought, damn it, after all the cool robot events I miss out on because they're in Seattle, or California, I'm sick and tired of getting left out just because I live in the sticks. I'm going to this one. Colorado isn't that far.

It's funny because you could see the same thought process go on when I asked my friend Earl Martin to come with me. "Oh I'd love to go, but really I can't..." It was his wife who convinced him, "Go! Go have fun!" (Wives of geeks, take note: you may not be able to break us of the habit of taking over the kitchen table with an occaisional soldering project, or the habit of accumulating mountains of computer electronics junk, no matter how often you roll your eyes at it, but a just little bit of encouragement from you goes a long way to making us feel enthusiastic again when we need that approval. I'm indebted to my own wife for selflessly sacrificing our living room so I can have a place to work on the robot to get it ready for the contest.)

I also asked my friend Ben to come along. He's a great guy to have around, but he's hard to pin down. When I wanted him to be one of my groomsman in my wedding, he was off in England! So I don't know if he'll be available for the trip but I hope so. He said he might be able to fix me up with a mini-ITX board running Intel's open source machine vision library - very cool!

My sister Ginny also asked to come along. I had automatically assumed it wouldn't be something she would be interested in, but when I mentioned it, she asked to come along. I don't know how the transportation situation will play out because my car doesn't have a lot of room, and most of it will be taken up by the robot, but I'm sure things will work out. If she wants to go I certainly don't object and who knows? We might turn her into an engineer, by osmosis.

Monday, December 1, 2008

PROP6502 Laptop Project


I made a laptop. It won honorable mention in the Parallax 2008 Propeller Design Contest. The point of the contest was to do something that shows off the unique capabilities of the Propeller microcontroller. I made a 6502-based laptop that uses the Propeller as its "chipset". I started with a toy laptop, and replaced all of the electronics with my own design to make it into a real working computer.


The screen is a 5.5 inch LCD TV for the laptop screen. The video decoder board, which was piggybacked on the LCD, made too tall a stack to fit inside the screen. After watching this presentation about modding by Benjamin Heckendorn, I decided not to try to make the laptop thicker. He gives the advice that you have to pick a height constraint and stick to it or else your project will grow to be "the Marvel Mystery House." Instead I figured out a way to unfolded the TV circuit board flat and place it below (not behind) the screen. Unfortunately that makes the LCD sit very high up the lid, so I made a nice decorative faceplate to distract the eye from how high and small the screen is.

The battery holder is embedded face up in the bottom so I wouldn't have to fashion a battery cover; the lid keeps the batteries in place when the laptop is closed.


Inside the laptop: at the top of the picture you see the back of the keyboard. In the second row, components from left to right: the keyboard decoder, back of the battery holder, and the CPU board. (More on the CPU board in a minute.) This toy laptop had a QWERTY keyboard, but it was not PS/2. Decoding this key matrix with the Propeller would be a waste of I/O pins. I realized that all keyboards are key matrices, including standard computer keyboards. So I simply cut the circuit board out of a real PS/2 keyboard from a Dell PC, and soldered the toy keyboard to the PS/2 board! The fact that that actually works (it does work!) is hilarious. Of course the key codes generated will be different; for instance pressing "A" might make the PS/2 board think you are pressing "X", but I simply translate the keycodes in software.


The laptop is based on a 6502 processor. I used the Propeller microcontroller as the "chipset" for the computer. The Propeller provides video, I/O, and memory control. The 6502 addresses a 64K static RAM chip, and the Propeller manipulates the control signals in order to load the initial program and monitor the address and data buses. Reducing chip count was key to making this board fit inside the laptop shell.


The reason I was able to do it with so few chips is a combination of the Propeller microcontroller's versatility, and a neat timing trick that allowed me to multiplex the data bus. After reading how old 6502 computers interleaved video access with processor accesses on the same bus, I realized I could use the same technique to allow the Propeller to access the bus in the interim period between each 6502 bus cycle. Since the 6502 puts the address out before the data is read or written, the Propeller can quickly transfer the 16 bit address onto the 8 bit data bus in two transfers, and still finish in time to return the data bus to a "normal" state so that the 6502 never knows anything happened.

What I learned from this project is that pins and signals are ways of dividing up the physical dimensions, but you can also think of time as a dimension that can be sliced up and parceled out. Making use of this extra dimension in a design can allow you to fold a complex system into a smaller physical space than it would seem to fit.


Once you've pared down your design, you've still got to wire it, and even a simple computer involves a nightmare of wiring. This part is harder than choosing the right chips to wire in the first place!

In a closely packed board, you can have a problem wiring it just from the sheer mass of copper packed into each square inch. I used strips cut from 80 conductor IDE ribbon cables to wire up the board. (Credit to Benjamin Heckendorn for giving this advice as well, in the same presentation I mentioned above.) These extremely thin IDE cable wires allowed me to pack more wiring into a smaller space, and it makes the wiring neater when you can group 4 or 8 together into ribbon cables.


This project gave me an excuse to finally use my Fluke 9010A Microcomputer Troubleshooter (pictured, front and center). My friend and former teacher, Earl Martin, once told me there were only ever two pieces of electronics equipment he wanted his whole life. One is a multichannel logic analyzer; the other is this Fluke 9010A, which he gave to me.


What this unit allows you to do is plug in to the CPU socket of a computer and exercise control of any aspect of the computer. You can test bus signals, read/write memory, even run programs and break on conditions. Technically it's an in-circuit emulator, but that term doesn't begin to cover the depth of what this tool can do. I would not have even attempted this project without it.


I had hoped to get better than honorable mention, but at least I'm on the same web page with the other winners, and received a $100 prize. I took the prize payment in the form of $100 of Parallax electronics components. I used the prize from this contest to buy parts for my project for next year's Propeller design contest: Norbert 2.0, a Propeller-controlled mobile Lego robot with a 5-degree of freedom manipulator arm. See you next time!

Tuesday, May 20, 2008

My New Old 64-bit AMD

It might be a sign it's time to upgrade when you find a better computer in the dumpster!

Melissa (my future wife) and I just moved to a nice little apartment in Norman. One of the perks of living in "the city" is people throw out way better stuff here. Just our first day in the apartment I spotted a computer tower sitting next to the dumpster. I was surprised Melissa didn't say anything when I came back from taking out the trash, carrying something larger back into the house than what was in the bag when I went out. She rolled her eyes but let me keep my new little "toy". Maybe she's used to it by now, or just tired of trying to talk me out of it! Because I'm a bit of a junk collector - it runs in the family. But I just get such a charge out of taking things that were broken/worthless and turning them into something that can be used.

This one was a real find - a 64 bit AMD Athlon 3200+; only a few years old. I was hoping it was a dual-core; it wasn't, but the board supports one, and as it is this processor is still slightly faster than my current best computer (a 2.6 GHz Pentium 4). Even though the clock speed of my Pentium is greater, AMD chips get more work done in each clock cycle, and this AMD one is 64 bit vs. my old one which is only 32 bit.

I can only imagine what kind of hot rig the previous owner must have if he throws away a good 64 bit machine! Perhaps he thought it was broken? Dead computers are almost always salvageable; usually a dying hard drive or finicky power supply is the only ailment, but I guess owners get so frustrated with such problems that they get pissed and throw out the whole thing. Or they don't understand that the CPU tower has interchangeable components inside it, many of which contain no moving parts and theoretically never wear out. This guy obviously knew at least a little about computers, because he removed the RAM, which I was sad to see missing because I'm always short of DDR sticks.

I cannibalized some RAM from one of my other computers, and I'm super excited now because the junk-computer seems to work fine!

In order to furnish this new computer, I'm going to basically split my best computer in half and make two: my best computer had 2 GB of RAM and matched hard drives in a mirror RAID; so I'm just going to put 1 GB of RAM in each and break the mirror. Sure it was fun setting up the mirror RAID a few months ago... (What am I saying? It was a pain in the ass setting up a software RAID to work with both Windows and Linux! Way more trouble than it's worth!) Anyhow as I was saying it's been fun playing with a RAID, but I can get more use out of the drives separately at the moment.

(Gosh, how do you break a mirror RAID? Do you just yank out one drive and just make the system deal with it?)

Unfortunately there'll be no pictures of this project. My beat up old camera finally died its last death. Cracked LCD, confused CPU, and it won't stay on anymore no matter how high I boost the voltage (it previously had an undervolt problem that I fixed by adding a 3rd battery). Even I can't fix it.

Sunday, April 27, 2008

Mountain Bike to Road Bike Conversion

Since my '63 Huffy was stolen, I've been saving parts for a new bicycle. I wanted another road bike, but all I found was a used mountain bike. I hate mountain bikes! Still, it was in good shape, so I bought it. When a derelict road bike showed up at the dump, I combined them to make the bike I really wanted. The Frankenbike! Skinny wheels, drop handlebars, and a big ironic sticker on it that says "Mountain Bike".


It has a thick steel frame and extra low gears from the mountain bike. The cargo rack came from the junk bike; I need to paint it. Did I say I was making a road bike? Maybe I mean touring bike. This thing's a tank! But I like to ride slow and steady anyway.


My original intent was to just swap wheels, but the donor road bike was a real wreck - rusty frame, taco-ed wheels, and seized bearings had eaten the hubs. With the rims I wanted to use attached to bad hubs, and rims I didn't want attached to my good hubs, I hatched a plan I figured was either mad or brilliant. Knowing nothing about wheel lacing or truing, I decided I'd take all the spokes out of the wheels, and transplant the good mountain bike hubs into the road bike rims.


When I tried to lace the new hubs into the road rims, I found the road bike rims have a larger inside diameter. It wasn't much, but it was enough that the mountain bike spokes wouldn't reach. I needed to use at least some mountain bike spokes, because a few of the road bike spokes were broken. Usually when you lace wheels, you pick a lacing pattern and buy spokes the right length. I needed to find lacing patterns that used the random combination of lengths I already had!


I found a site which described the Crow's Foot pattern. This was perfect for what I needed, as I could use the shorter mountain bike spoke for the radial spokes, and the longer road bike spokes for the two crossing "toes". The pattern looks nice and it's very stiff. In this picture, you can see the distinctive 3-spoke crossings of the crow's foot.


That's a front fork but it's got a rear wheel hub stuck in it, sans gears. The mountain bike spokes were just too short, even for Crow's Foot. But a rear wheel hub has a larger diameter than a front wheel hub; it gets these shorter spokes closer to rim, just enough to make it work. Of course that caused problems all its own. A rear hub is wider than a front hub, which means the front fork isn't wide enough to go around the cone nuts. I didn't want to bend the forks out, so I had to bring the cone nuts in. Using the angle grinder and nerves of steel, I cut the cone nuts down to mere slivers, leaving only the sloped bearing race. I cut them so thin I could fit both them and the nuts that lock them within the forks. I also had to notch the axle bolt so it would slip into the smaller fork holes.


Despite the difficulties, using a rear hub for the front wheel is a great mod. Front wheel hubs are narrow and use smaller bearings on a smaller axle. Why? You'd think the front wheel is the one you'd least want to wobble, and it will take the brunt of any crash. Rear hubs, being wider, place the bearings further apart, so play in the bearings has less effect at the rim than with narrow hubs. It gives a steeper dish to the spokes, which also resists side to side forces better. And this hub has uncaged bearings, more of them, in a larger race. The difference is noticeable. There is zero wobble. None. It rides like it's on rails.


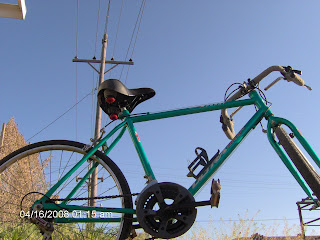
Funny story about the bearings. I tried the smaller axle from the old front hub to see if it would hold the large bearings in. It didn't, and the bearings went bouncing all over my shop. I recovered all but one of the bearings. When I finally found that last bearing, I noticed it had hole drilled through it. I'd never seen that before, and I couldn't figure out why someone would make a bearing with a hole in it! But it was clearly one of the right bearings - it was the same size as all the others, and the same shiny silver color. Maybe the hole was so it would retain grease? I shrugged and put it into the race with the others. Well the next day I found the missing bearing. I thought, if I'm holding the missing bearing in my hand, what the crap did I put into the bearing race yesterday? I removed the bearing with the hole in it and scratched it. Silver paint flaked off. What I had was one of those metalized plastic beads they use for craft necklaces! By chance it happened to be on the floor in the same place I dropped my bearings! I don't know what would have happened if I'd left it in, but the wheel turned fine with a plastic bearing.


For the rear wheel, I used Crow's Foot on one side, and made up my own pattern for the other. I came up with a daring plan to use an unbalanced lacing pattern. There are two forward-pulling spokes for every one backward-pulling spoke. The idea is that when you're pedalling, there are two spokes transmitting your torque to the ground for every one that's not. Does it lead to the wheel twisting under load? It's hard to be sure because the rim was already bent when I got it. But I've been riding it like this and haven't had a problem. I call it the "Dreamcatcher" lacing pattern; the spokes weave many times.


I didn't want to restring the shifter cables, so I kept the original shifters. Unfortunately they were designed for a straight bar. On the drop bars always the shift lever was blocked, or the cable interfered with the brakes or my hands. Putting them on the outside was the least bothersome place. I'm saving the two levers on the stem for clutch levers to engage the motors if I make the bike electric.


The handlebars had awful rubber grips that kept slipping off. I got rid of them and wrapped the handlebars with some good Cinelli cork tape. Not bad for my first try.


Well, that's my bicycle. There's nothing like riding a bike knowing every piece that makes up the whole is there because you chose it, not the factory.

Thursday, April 24, 2008

Ferron's Guaranteed No Mess No Mixups Method for Swapping Rims without Relacing

I'm restoring my fiancée's bicycle. The hub and spokes are ok, but the bottom of the rims once sat in a puddle until they rusted out. Luckily I had a spare pair of rims left over from my last bicycle project.


It's fairly easy to de-lace a wheel. But getting the lacing right when you put the new rims on looks really hard! All those criss-crossings and spokes going alternating ways... Who can keep track of it? And if you miss a spoke, you'll throw off the whole process. I found websites which provide wheel lacing patterns, but I've got a much easier way than lacing from scratch.


The basic idea is that you only transfer one lace at a time. You copy the pattern from the old wheel step by step, and you'll never miss a spoke.


Start by holding the two wheels side-by-side between your knees. Make sure the right side spoke holes in one wheel are next to the right side holes in the other, and the left are by the left. As seen in this picture, the valve holes might not line up although the left-right spoke holes do.


With a flat head bit, completely unscrew a left side nipple.


Move the spoke over to the other rim and screw it in loosely.


Spokes which cross underneath are blocked by the ones on top. Always transfer the spoke that crosses on top first, then transfer the one that crossed under it.


As you go around transfering each left side spoke, loosen but do not remove each right side nipple.


Save any extra nipples you can get off other wheels, because you will most likely round off a few nipples during the transfer, and you'll need to replace them.


When you've transferred all the left side spokes, you will end up with this. If you welded these rims together, you could make a monster "dualie" mountain bike!


Now work around the wheel and transfer the remaining right side spokes one by one. Except this time, transfer the one that crosses under first, so it will reach, then do the one that crossed over.


Ta-da! Now the old rim is free, and the spokes are all in the new rim. Yet you never undid more than one spoke at a time. Magic!


Don't try to ride it yet! You still need to true the wheel. I'll explain in another post the technique I came up with to true my wheels without special equipment.

Tuesday, March 4, 2008

Small Form Factor Case Mod


I wanted to build a custom firewall/router PC. Something small and compact, and which would use up some of my old computer parts.

Let's see what we have to work with?


What a ridiculously bulbous case! No wonder Packard-Bell went out of business.


Ah, that's better: The metal part of the case isn't too bad. We can work with this!


Drives? Who needs 'em! With the drive bay cut off, I shortened the case by a third. Then I used new rivets to attach the old top at the new height. Very clean - looks almost stock.


Unfortunately, the side panel now doesn't fit.


Mr. Side Panel, meet Mr. Angle Grinder.


I knew I'd never be able to cut a perfect edge with the grinder, so I riveted aluminium bar stock to make a skirt to stiffen the panel and mask the imperfection. If you can't make it, fake it!

Now I just need a face plate.


Look! A perfect fit - other than being ginormously tall. I really like the styling on this face plate better though.


We'll just cut it in half too. Uh oh... I didn't account for that big hole on the top of faceplate after it's cut.


What better way to fix the top of the faceplate than with the, er, top? The steel files in the background: I used those to trim the cuts so they'd glue together flush. I have mad skills with files. You can see here there's still going to be a seam no matter what I do.


Time to pull a design trick with the magician's old standby: indirection! Since I can't make the seam impossible to notice, I'll do the opposite and call attention to the area with a little decoration. Who knew strap iron could be so appealing? Earl Martin calls my style "industrial art deco," which I think has a nice ring to it.


Here's how I laid the parts out to fit them in such a small space.


The finished case mod in all it's glory, sitting as the capstone on my pyramid of computers.

Tuesday, January 1, 2008

A Curiously Chocolate Radio

I've been saving Altoids tins for years. They're full of project possibilities: how much electronics could you cram into one? What neat things will people see when they peek inside?

From the outside this looks like an ordinary Altoids tin. But what's under the cover?


Why, it's a shiny pocket radio!

I got the circuit board out of a cheap FM radio, but I added the batteries and speaker. (The original radio only had head phones.) It turned out to be very difficult to get the antenna to work right. The original radio used the head phones to double as a loop antenna, but the speaker I replaced them with doesn't have long enough wires and wouldn't get any reception with the metal tin surrounding it. I solved it by running one leg of the audio out the back as an antenna wire, and I grounded the other side of the audio to the metal case.

Now the radio gets better reception than it did even before I hacked it!

The chocolate brown theme of the tin reminded me of old wooden cabinet phonographs, so I thought it would be neat to make the radio so that you prop the lid open to use it, as if it were from that era.

The speaker is held to the lid with foam tape, which keeps it from buzzing. The circuit board is held on one side with foam tape and screws on the other side, and the batteries are in a Radio Shack AAA battery holder, also secured with foam tape. I used 190 proof Everclear to pre-clean the inside of the tin, so the foam tape would stick tight.

I'm pleased with how this project turned out. It's one of the few projects I've actually seen through to completion in years - a testament to the wisdom of choosing a simple project. And it's something I will actually use!